最近接到一个需求,需要做一个在后台播放视频的功能。折腾了一下,最后总算完成了。因此写一篇文章,介绍下具体的实现步骤,也说说自己遇到的坑,算是总结和记录。
前言
当 App 退到后台时,会进入 suspend 状态,若此时在播放视频,则会自动暂停。我们需要实现的效果是,当 App 退到后台时,视频中的声音还能继续播放。另外,我们还同时实现视频的连续播放功能,和在锁屏界面控制视频播放的功能。具体怎么做,下面听我一一道来。
注意:由于 iOS 模拟器存在 BUG,尤其是 iOS 11 的模拟器,不能在后台播放音频,因此以下功能最好使用真机测试。
一、后台播放音频
要实现后台播放视频功能,首先需要实现后台播放音频功能。实现后台播放音频很简单,只要简单配置一下就可以了。总共有三步:
1. 修改 Info.plist
在 Info.plist 中添加 Required background modes ,并在下面添加一项 App plays audio or streams audio/video using AirPlay 。如图所示:

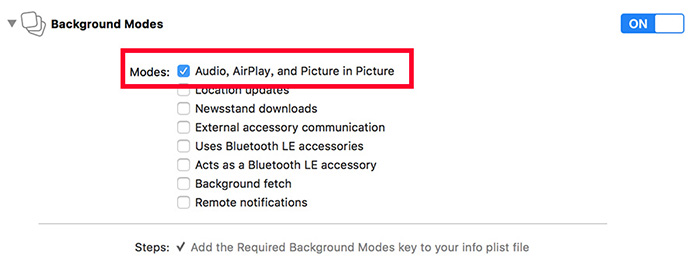
2. 修改 Capabilities
在 Capabilities 中开启 Background Modes 。如图所示:
3. 修改 AppDelegate
在 AppDelegate 的 application: didFinishLaunchingWithOptions: 方法中,添加以下代码:
1
2
3
4
|
AVAudioSession *audioSession = [AVAudioSession sharedInstance];
[audioSession setCategory:AVAudioSessionCategoryPlayback error:nil];
[audioSession setActive:YES error:nil];
|
至此就实现了后台播放音频的功能,但这不是我们的最终目的,请继续往下看。
二、后台播放视频
网上讲实现后台播放视频的资料并不多(可能比较少有这么坑的需求)。我在网上找了一圈,只有 这篇文章 提到了,方法也很简单,分为两步:
1. 退到后台时移除 playerLayer 上的 player
在 viewController 中添加退到后台监听:
1
2
3
4
5
| NSNotificationCenter *center = [NSNotificationCenter defaultCenter];
[center addObserver:self
selector:@selector(removePlayerOnPlayerLayer)
name:UIApplicationDidEnterBackgroundNotification
object:nil];
|
移除 player :
1
2
3
4
| - (void)removePlayerOnPlayerLayer {
_playerLayer.player = nil;
}
|
2. 回到前台时重新添加 player
在 viewController 中添加回到前台监听:
1
2
3
4
5
| NSNotificationCenter *center = [NSNotificationCenter defaultCenter];
[center addObserver:self
selector:@selector(resetPlayerToPlayerLayer)
name:UIApplicationWillEnterForegroundNotification
object:nil];
|
重新添加 player :
1
2
3
4
| - (void)resetPlayerToPlayerLayer {
_playerLayer.player = _player;
}
|
这样简单的后台播放视频就实现了。
对于上面的实现后台播放视频的方法,我的理解是,iOS 是支持后台播放音频的,而 AVPlayer 在播放视频时,会将图像渲染在 layer 上,因此只要取消图像的渲染,只播放音频,就可以实现后台播放。
3. 连续播放视频
后台连续播放视频的逻辑,其实和前台连续播放的逻辑一样。可以通过监听 playerItem 播放结束的通知来切换歌曲,则当播放结束时,需要移除对当前 playerItem 的监听,然后添加下一个 playerItem 的监听。
这里直接通过判断进度条是否完成,来切换歌曲。
1
2
3
4
5
6
7
8
|
__weak ViewController * weakSelf = self;
[self.player addPeriodicTimeObserverForInterval:CMTimeMakeWithSeconds(1, NSEC_PER_SEC)
queue:NULL
usingBlock:^(CMTime time) {
[weakSelf updateProgressView];
}];
|
1
2
3
4
5
6
7
8
9
10
11
12
13
|
- (void)updateProgressView {
self.currentDuration = CMTimeGetSeconds(_player.currentItem.duration);
CGFloat progress = CMTimeGetSeconds(_player.currentItem.currentTime) / _currentDuration;
if (progress == 1.0f) {
[self playNextVideo];
} else {
[_viewVideoProgress setValue:progress];
}
}
|
下面插播一条 CMTime 的广告。可跳过。
上面监听播放进度的时候,用到了一个叫 CMTime 的东西,这里简单地讲一下我的理解。
一般我们用 CMTime 的时候,都是使用 CMTimeGetSeconds(time) 将它转成秒数。
那为何不直接使用 NSTimeInterval 来表示时间就好了?
原因只有一个 —— 精度。
浮点数没有办法进行准确的加减运算,当多次加减后,可能会出现较大误差。因此在视频一般用 CMTime 来表示时间,因为 CMTime 可以规定最小的精度,从而保证累加后时间的准确性。
CMTime 的构造方法 CMTimeMakeWithSeconds(seconds, timescale), seconds 表示秒数, 1 / timescale 表示最小精度。
另一个构造方法 CMTimeMake(value, timescale) ,其中 seconds = value / timescale 。
即 CMTimeMakeWithSeconds(1, 1000) 等价于 CMTimeMake(1000, 1000) ,都表示 1 秒,最小精度为 0.001 。
注意:需要满足 seconds >= 1 / timescale ,即 value > 1,这也是精度存在的意义。
三、添加远程控制
1. 用 MPNowPlayingInfoCenter 显示歌曲信息
先上代码:
1
2
3
4
5
6
7
8
9
10
11
12
13
14
15
16
17
18
19
20
21
22
23
24
25
26
27
28
29
30
31
32
33
34
35
36
37
38
39
40
41
42
|
- (void)updateLockScreenInfo {
if (!_player) {
return;
}
MPNowPlayingInfoCenter *playingInfoCenter = [MPNowPlayingInfoCenter defaultCenter];
NSMutableDictionary *playingInfoDict = [NSMutableDictionary dictionary];
[playingInfoDict setObject:[NSString stringWithFormat:@"歌曲%ld", (long)_currentIndex + 1]
forKey:MPMediaItemPropertyTitle];
[playingInfoDict setObject:[NSString stringWithFormat:@"专辑%ld", (long)_currentIndex + 1]
forKey:MPMediaItemPropertyAlbumTitle];
UIImage *image = [UIImage imageNamed:[NSString stringWithFormat:@"cover%ld.jpg", (long)_currentIndex + 1]];
if (image) {
MPMediaItemArtwork *artwork = [[MPMediaItemArtwork alloc] initWithImage:image];
[playingInfoDict setObject:artwork forKey:MPMediaItemPropertyArtwork];
}
NSNumber *playbackDuration = @(CMTimeGetSeconds(_player.currentItem.duration));
NSNumber *elapsedPlaybackTime = @(CMTimeGetSeconds(_player.currentItem.currentTime));
if (!playbackDuration || !elapsedPlaybackTime) {
return;
}
[playingInfoDict setObject:playbackDuration
forKey:MPMediaItemPropertyPlaybackDuration];
[playingInfoDict setObject:elapsedPlaybackTime
forKey:MPNowPlayingInfoPropertyElapsedPlaybackTime];
[playingInfoDict setObject:@(_player.rate) forKey:MPNowPlayingInfoPropertyPlaybackRate];
playingInfoCenter.nowPlayingInfo = playingInfoDict;
}
|
注意: updateLockScreenInfo 不需要频繁调用,锁屏界面的进度条会自己计时,只需要在关键的时刻去同步这个已播放时长。一般需要调用的时刻有,切换歌曲、暂停、播放、拖动进度条等。
这里有个坑。我们知道 player 有个 rate 属性,为 0 的时候表示暂停,为 1.0 的时候表示播放。相应的, nowPlayingInfo 也有个 MPNowPlayingInfoPropertyPlaybackRate 属性。前面说到,「锁屏界面的进度条会自己计时」,它是否在计时就是取决于这个属性。坑的地方在于,这个属性和 player 的 rate 并不同步。也就是说,单纯地在锁屏界面点暂停后, player 会暂停, rate 也会变成 0 ,但是 MPNowPlayingInfoPropertyPlaybackRate 却不为 0 。导致的结果是,在锁屏界面点击了暂停按钮,这个时候进度条表面看起来停止了走动,但是其实还是在计时,所以再点击播放的时候,锁屏界面进度条的光标会发生位置闪动。
解决方法:在视频暂停和播放的时候,同步视频的已播放时长 _player.currentItem.currentTime 和 MPNowPlayingInfoPropertyElapsedPlaybackTime 、视频的当前播放速率 _player.rate 和 MPNowPlayingInfoPropertyPlaybackRate 。
2. 用 MPRemoteCommandCenter 实现播放控制
先上代码:
1
2
3
4
5
6
7
8
9
10
11
12
13
14
15
16
17
18
19
20
21
22
23
24
25
26
27
|
- (void)createRemoteCommandCenter {
MPRemoteCommandCenter *commandCenter = [MPRemoteCommandCenter sharedCommandCenter];
MPRemoteCommand *pauseCommand = [commandCenter pauseCommand];
[pauseCommand setEnabled:YES];
[pauseCommand addTarget:self action:@selector(remotePauseEvent)];
MPRemoteCommand *playCommand = [commandCenter playCommand];
[playCommand setEnabled:YES];
[playCommand addTarget:self action:@selector(remotePlayEvent)];
MPRemoteCommand *nextCommand = [commandCenter nextTrackCommand];
[nextCommand setEnabled:YES];
[nextCommand addTarget:self action:@selector(remoteNextEvent)];
MPRemoteCommand *previousCommand = [commandCenter previousTrackCommand];
[previousCommand setEnabled:YES];
[previousCommand addTarget:self action:@selector(remotePreviousEvent)];
if (@available(iOS 9.1, *)) {
MPRemoteCommand *changePlaybackPositionCommand = [commandCenter changePlaybackPositionCommand];
[changePlaybackPositionCommand setEnabled:YES];
[changePlaybackPositionCommand addTarget:self action:@selector(remoteChangePlaybackPosition:)];
}
}
|
在 iOS 7.1 之后,可以通过 MPRemoteCommandCenter 来控制音频播放。每个控制操作都封装为一个 MPRemoteCommand 对象,给 MPRemoteCommand 添加响应事件有两种方式:
一种是通过 addTargetWithHandler:,以 Block 的方式传入响应事件,需要返回 MPRemoteCommandHandlerStatusSuccess 来告知响应成功。
另一种是通过 addTarget: action:,因为 MPRemoteCommandCenter 是个单例,所以在 target 的 dealloc 中要记得调用 removeTarget: 。如下所示:
1
2
3
4
5
6
7
8
9
10
11
12
13
14
15
16
17
| - (void)dealloc {
[self removeCommandCenterTargets];
}
- (void)removeCommandCenterTargets {
MPRemoteCommandCenter *commandCenter = [MPRemoteCommandCenter sharedCommandCenter];
[[commandCenter playCommand] removeTarget:self];
[[commandCenter pauseCommand] removeTarget:self];
[[commandCenter nextTrackCommand] removeTarget:self];
[[commandCenter previousTrackCommand] removeTarget:self];
if (@available(iOS 9.1, *)) {
[commandCenter.changePlaybackPositionCommand removeTarget:self];
}
}
|
注意:因为 changePlaybackPositionCommand 在 iOS 9.1 以后才可用,所以这里加了系统判断。
到这里就实现了锁屏界面的播放控制。
源码
请到 GitHub 上查看完整例子。
参考