TNN 是腾讯优图实验室打造的高性能推理框架,目前已经在 GitHub 上开源,并在手Q、微视、P图等应用中落地。本文可能是比官方文档更加友好的入门指南,讲解如何从零在 iOS 工程中使用 TNN 框架。
TNN 是一个跨平台的框架,训练好的 TNN 模型可以直接在不同的平台使用。在官方介绍中没有 TNN 的全称,可能是 Tencent Neural Networks 。
目前,腾讯内部基于 TNN 框架落地的 AI 能力有 人脸识别、抠背、GAN 玩法 等。关于 TNN 的更多介绍可以到 GitHub 上查看。
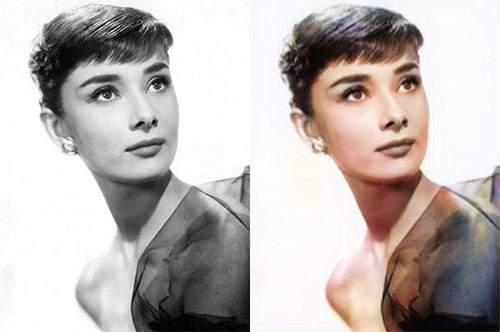
下面以一个灰度图自动上色的例子,讲解 TNN 的使用流程。
〇、引入 SDK
在 新建的 iOS 工程 中引入 TNN SDK 分为三步:
- 编译 TNN 源码,生成
tnn.framework 和 tnn.bundle,把它们加入工程,并添加工程配置。这一步可以按照官方的 TNN 编译指南 的 iOS 部分进行。
- 在
Build Phases->Link Binary With Libraries 中添加依赖库 Accelerate.framework 和 CoreML.framework 。
- 将默认生成的
ViewController.m 后缀改成 .mm 。
然后执行编译,没有报错则说明引入成功。
一、模型解析
模型包括两个文件,分别以 .tnnmodel 和 .tnnproto 为后缀。
解析的过程如下:
- 生成
TNN 实例。
- 读取
.tnnmodel 和 .tnnproto 的内容,封装成 ModelConfig。
- 调用
TNN 的 Init 方法来加载 ModelConfig。
关键代码:
1
2
3
4
5
6
7
8
9
10
11
12
13
14
15
16
17
18
19
20
21
|
self.network = new TNN();
NSString *modelPath = [[NSBundle mainBundle] pathForResource:@"G_8_GRAY2RGB_256" ofType:@"tnnmodel"];
NSString *protoPath = [[NSBundle mainBundle] pathForResource:@"G_8_GRAY2RGB_256" ofType:@"tnnproto"];
string protoContent = [NSString stringWithContentsOfFile:protoPath
encoding:NSUTF8StringEncoding
error:nil].UTF8String;
NSData *modelData = [NSData dataWithContentsOfFile:modelPath];
string modelContent = [modelData length] > 0 ? string((const char *)[modelData bytes], [modelData length]) : "";
ModelConfig modelConfig;
modelConfig.model_type = MODEL_TYPE_TNN;
modelConfig.params = {protoContent, modelContent};
Status status = self.network->Init(modelConfig);
|
二、构建网络
构建网络的步骤:
- 创建配置
NetworkConfig,需要指定的参数有 device_type 和 library_path。在移动端上一般用 GPU 来跑模型,所以在 iOS 上 device_type 一般用 DEVICE_METAL。library_path 则指定 tnn.metallib 的路径。
- 调用
TNN 的 CreateInst 方法,加载 NetworkConfig 生成网络实例。
关键代码:
1
2
3
4
5
6
7
8
9
10
| NSString *bundlePath = [[NSBundle mainBundle] pathForResource:@"tnn" ofType:@"bundle"];
NSString *libPath = [bundlePath stringByAppendingPathComponent:@"tnn.metallib"];
Status status;
NetworkConfig networkConfig;
networkConfig.device_type = DEVICE_METAL;
networkConfig.library_path = {libPath.UTF8String};
self.networkInstance = self.network->CreateInst(networkConfig, status);
|
三、预处理
每个模型都有特定的数据输入格式,大部分需要将图像 4 个通道的数据转化到 0 ~ 1 或者 -1 ~ 1 范围。所以在执行网络之前,需要一个预处理步骤。
在 TNN 中,模型可以理解成封装好的「函数」,我们只需要关心「函数」的输入输出,「函数」的具体实现可以不用管。
TNN 中模型的输入输出是 Blob 格式,模型可以支持多个 Blob 的输入和多个 Blob 的输出。这个例子的模型是单输入单输出。
在进行预处理之前,先要获取输入的 Blob :
1
2
3
| BlobMap inputBlobs;
Status status = self.networkInstance->GetAllInputBlobs(inputBlobs);
Blob *networkInput = inputBlobs.begin()->second;
|
另外,还需要获取准备输入的图像数据,这里是一个 Metal 的纹理:
1
2
3
4
5
| MTKTextureLoader *textureLoader = [[MTKTextureLoader alloc] initWithDevice:MTLCreateSystemDefaultDevice()];
NSDictionary *options = @{
MTKTextureLoaderOptionSRGB : @NO
};
id<MTLTexture> texture = [textureLoader newTextureWithCGImage:image.CGImage options:options error:NULL];
|
然后,可以使用两种方式进行预处理:默认方式、自定义方式 。
1、默认方式
前面说到,预处理的目的大部分是进行数值范围的转化,所以 TNN 提供了一种很方便的转化方式,可以通过 scale、bias 参数来设置转化的范围,还可以通过 reverse_channel 来设置通道转换,例如将 RGB 转成 BGR 。
参考代码:
1
2
3
4
5
6
7
8
9
| Mat inputMat = {DEVICE_METAL, tnn::N8UC4, (__bridge void*)texture};
shared_ptr<BlobConverter> preprocessor = make_shared<BlobConverter>(networkInput);
id<MTLCommandQueue> commandQueue = [self fetchCommandQueue];
MatConvertParam input_cvt_param;
input_cvt_param.scale = {2.0 / 255, 2.0 / 255, 2.0 / 255, 0};
input_cvt_param.bias = {-1.0, -1.0, -1.0, 0};
input_cvt_param.reverse_channel = true;
preprocessor->ConvertFromMatAsync(inputMat, input_cvt_param, (__bridge void*)commandQueue);
|
上面的转化参数可以将 0 ~ 255 的范围转到 -1 ~ 1 。
设置好转化的参数后,调用 ConvertFromMatAsync 执行预处理。
2、自定义方式
如果模型的输入格式比较特异化,只通过 scale、bias 无法进行调整,则需要使用自定义的方式。
自定义的方式需要先获取输入 Blob 的 MTLBuffer ,然后构造 MTLComputePipelineState,实现自定义的 kernel 函数,将预处理的结果写到 MTLBuffer 中。
参考代码:
1
2
3
4
5
6
7
8
9
10
11
12
13
14
15
16
17
18
19
20
21
22
23
| id<MTLCommandQueue> commandQueue = [self fetchCommandQueue];
id<MTLCommandBuffer> commandBuffer = [commandQueue commandBuffer];
[commandBuffer enqueue];
id<MTLBuffer> blobBuffer = (__bridge id<MTLBuffer>)(void *)networkInput->GetHandle().base;
NSUInteger blobOffset = (NSUInteger)networkInput->GetHandle().bytes_offset;
id<MTLComputeCommandEncoder> encoder = [commandBuffer computeCommandEncoder];
id<MTLComputePipelineState> pipelineState = [self computePipelineStateWithLibrary:self.library functionName:@"test_preprocess"];
[encoder setComputePipelineState:pipelineState];
[encoder setTexture:texture atIndex:0];
[encoder setBuffer:blobBuffer offset:blobOffset atIndex:0];
NSUInteger width = pipelineState.threadExecutionWidth;
NSUInteger height = pipelineState.maxTotalThreadsPerThreadgroup / width;
MTLSize groupThreads = {width, height, (NSUInteger)1};
MTLSize groups = {((texture.width + width - 1) / width), ((texture.height + height - 1) / height), 1};
[encoder dispatchThreadgroups:groups threadsPerThreadgroup:groupThreads];
[encoder endEncoding];
[commandBuffer commit];
[commandBuffer waitUntilScheduled];
|
这里的 dispatchThreadgroups:threadsPerThreadgroup: 是在设置 GPU 并发处理时的线程组划分和每个线程组的线程数。这是官方比较推荐的写法,详情可以查看 官方文档 。
预处理的 kernel 函数:
1
2
3
4
5
6
7
8
9
10
11
12
13
14
15
16
17
| kernel void test_preprocess(texture2d<half, access::read> inputTexture [[texture(0)]],
device half4 *dst [[buffer(0)]],
ushort2 gid [[thread_position_in_grid]]) {
int width = inputTexture.get_width();
int height = inputTexture.get_height();
if (any(gid >= ushort2(width, height))) {
return;
}
const half4 in = inputTexture.read(uint2(gid));
auto out = dst + (int)gid.y * width + (int)gid.x;
*out = half4(in.x * 2 - 1,
in.y * 2 - 1,
in.z * 2 - 1,
0.0);
}
|
这里做的事情是从 inputTexture 中读取数据,然后写到 dst 中。
四、执行网络
预处理之后,调用 ForwardAsync 来执行网络。
1
| self.networkInstance->ForwardAsync([]{});
|
五、后处理
与预处理类似,网络执行之后输出的数据,一般不能直接拿来使用。比如大部分模型输出的数据是 0 ~ 1 或者 -1 ~ 1 范围,而图像 4 个通道的数据是 0 ~ 255,所以还需要一个后处理步骤。
后处理与预处理一样,也有 默认 和 自定义 两种方式。只不过后处理取的是输出的 Blob 。
1、默认方式
预处理是调用 ConvertFromMatAsync 来执行,而后处理是调用 ConvertToMatAsync 来执行。
参考代码:
1
2
3
4
5
6
7
8
9
| Mat outputMat = {DEVICE_METAL, tnn::N8UC4, (__bridge void*)texture};
shared_ptr<BlobConverter> postprocessor = make_shared<BlobConverter>(networkOutput);
id<MTLCommandQueue> commandQueue = [self fetchCommandQueue];
MatConvertParam output_cvt_param;
output_cvt_param.scale = {255 / 2.0, 255 / 2.0, 255 / 2.0, 0};
output_cvt_param.bias = {255 / 2.0, 255 / 2.0, 255 / 2.0, 255};
output_cvt_param.reverse_channel = true;
postprocessor->ConvertToMatAsync(outputMat, output_cvt_param, (__bridge void*)commandQueue);
|
2、自定义方式
使用自定义方式时,后处理的代码与预处理基本相同,只是加载的 kernel 函数不同。
参考代码:
1
2
3
4
5
6
7
8
9
10
11
12
13
14
15
16
17
18
19
20
21
22
23
| id<MTLCommandQueue> commandQueue = [self fetchCommandQueue];
id<MTLCommandBuffer> commandBuffer = [commandQueue commandBuffer];
[commandBuffer enqueue];
id<MTLBuffer> blobBuffer = (__bridge id<MTLBuffer>)(void *)networkOutput->GetHandle().base;
NSUInteger blobOffset = (NSUInteger)networkOutput->GetHandle().bytes_offset;
id<MTLComputeCommandEncoder> encoder = [commandBuffer computeCommandEncoder];
id<MTLComputePipelineState> pipelineState = [self computePipelineStateWithLibrary:self.library functionName:@"test_postprocess"];
[encoder setComputePipelineState:pipelineState];
[encoder setTexture:texture atIndex:0];
[encoder setBuffer:blobBuffer offset:blobOffset atIndex:0];
NSUInteger width = pipelineState.threadExecutionWidth;
NSUInteger height = pipelineState.maxTotalThreadsPerThreadgroup / width;
MTLSize groupThreads = {width, height, (NSUInteger)1};
MTLSize groups = {((texture.width + width - 1) / width), ((texture.height + height - 1) / height), 1};
[encoder dispatchThreadgroups:groups threadsPerThreadgroup:groupThreads];
[encoder endEncoding];
[commandBuffer commit];
[commandBuffer waitUntilScheduled];
|
对应的 kernel 函数实现如下:
1
2
3
4
5
6
7
8
9
10
11
12
13
14
15
16
| kernel void test_postprocess(texture2d<half, access::write> outputTexture [[texture(0)]],
const device half4 *src0 [[buffer(0)]],
uint2 gid [[thread_position_in_grid]]) {
int width = outputTexture.get_width();
int height = outputTexture.get_height();
if (any(gid >= uint2(width, height))) {
return;
}
half4 in = src0[(int)gid.y * width + (int)gid.x];
in.x = (in.x + 1) / 2;
in.y = (in.y + 1) / 2;
in.z = (in.z + 1) / 2;
in.w = 1;
outputTexture.write(in, uint2(gid));
}
|
这里做的事情是从 src0 中读取数据,然后写到 outputTexture 中。
最后看一下效果:
源码
请到 GitHub 上查看完整代码。